Reskinning
Welcome to the Reskinning Tutorial, I hope this helps!
Things you will need... |
Important NotesThis tutorial is made using the Renfe Class 447m. If you use other assets the way to edit them will become pretty obvious after reading this tutorial. Also, it is advised to familiarize yourself with Irfanview and Image2TGA before beginning this tutorial, however, you can continue will the help provided in the tutorial.
|
Let's Start!
1. Locate the Renfe 447M in Content Manager
2. Clear Open for Edit
3. Right click the Renfe 447M and click clone
4. Make sure it is cloned, and is the only asset in Open for Edit.
5. Open Image2TGA
6. In Image2TGA, click file, then open. Locate the Auran file in Program Files, open the UserData folder and then open the file Editing
7. Open the folder New Asset, then open the folder: renfe_447m_body
8. Find the file Texturacaja and open it.
9. This image should show in Image2TGA
10. Click file, then click save as. If it hasn't automatically named itself texturacaja then do so yourself and save it.
11. Open Content Manager
12. Right click the cloned Renfe 447m in Open for Edit
13. Select "Edit" then "Edit in Explorer"
14. Once again, go the the file renfe_447m_body and open the texturacaja.TGA image with Irfanview.
IMPORTANT: The file opened with Irfanview must be the texturacaja.TGA file not the texturacaje.TEXTURE/txt
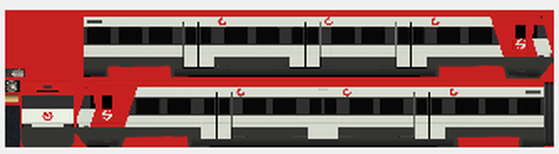
15. Now you can paint on to the train. Note, do not go over the edges.
Hint: The 2D picture is obvious, the Cab and sides are clearly shown.
16. As an example, lets add yellow ends to it. Click edit then select "Show Paint Dialog"
11. Open Content Manager
12. Right click the cloned Renfe 447m in Open for Edit
13. Select "Edit" then "Edit in Explorer"
14. Once again, go the the file renfe_447m_body and open the texturacaja.TGA image with Irfanview.
IMPORTANT: The file opened with Irfanview must be the texturacaja.TGA file not the texturacaje.TEXTURE/txt
15. Now you can paint on to the train. Note, do not go over the edges.
Hint: The 2D picture is obvious, the Cab and sides are clearly shown.
16. As an example, lets add yellow ends to it. Click edit then select "Show Paint Dialog"
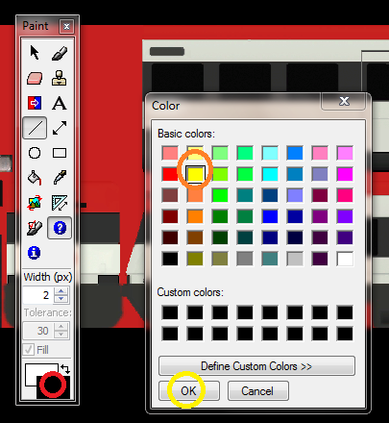
17. In this picture I have added 3 circles. Click the area where they are in the order: red first, then orange, then yellow.
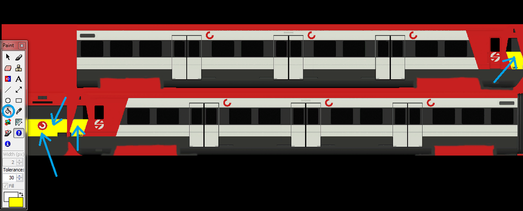
18.Now click the Fill tool, (Circled blue in this picture) then click where all of the blue arrows point to.
19. Click file, then click "Save (Original Folder)"
20. Now close Irfanview and commit the asset in Content Manager.
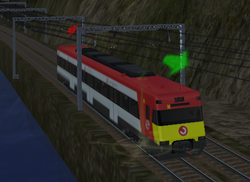
Hopefully the asset will appear, working properly, in Surveyor.
20. Now close Irfanview and commit the asset in Content Manager.
Hopefully the asset will appear, working properly, in Surveyor.
Doesn't work?If so, ensure you have covered everything in the Checklist.
If you have covered everything in the checklist, either re-do your asset, ensuring you read carefully and slowly through the tutorial, or you could... |
CHECKLIST- I have saved the .TGA file via the "Save (Original Folder)" button.
- I have not changed the size of the texture file. - I have not deleted, or renamed any of the files in the asset's folder. - I have not altered the config file in any way. - I have made sure the asset has commited properley |
